A good knot can mean the difference between landing the fish of a lifetime and watching it swim away with your lure. Whether you're spooling up a new reel, tying on a hook, or joining two lines together, knowing the right knot for the job — and tying it correctly — is one of the most fundamental skills in fishing.
In this guide, we'll walk through the knots every angler in the Pacific Northwest should have in their toolkit, from securing line to your reel all the way through joining lines and rigging droppers. Each knot includes step-by-step diagrams so you can follow along and practice at home before you hit the water.
Quick Tips Before You Start
A few things to keep in mind no matter which knot you're tying:
- Check your line first. Before tying any knot, inspect your line for nicks, abrasions, or other visible damage.
- Go slow and steady. Draw the knot together evenly and with minimal friction so it seats smoothly — rushing it is the most common cause of a weak knot.
- Trim it close. Once a knot is tightened and seated correctly, trim the tag end close to avoid it catching on rod guides, hooks, or weeds.
- Practice at home. Like most anglers, you'll end up relying on just a handful of knots for the majority of situations — but you have to build the muscle memory first.
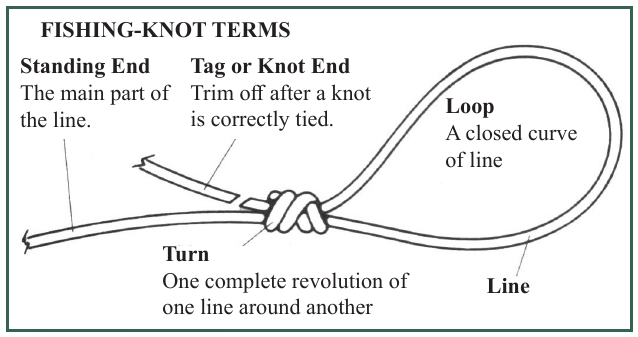
Fishing Knot Terms
Before diving into specific knots, it helps to know the vocabulary anglers use to describe the parts of a knot:
- Standing End — the main part of the line.
- Tag or Knot End — the working end you trim off after the knot is correctly tied.
- Turn — one complete revolution of one line around another.
- Loop — a closed curve of line.
Securing Line to Reel or Spool
The first connection every angler needs is attaching the line to the reel or spool itself. The Arbor Knot (also called the Reel Knot) is simple to tie and has proven to be an effective, reliable choice for this job.
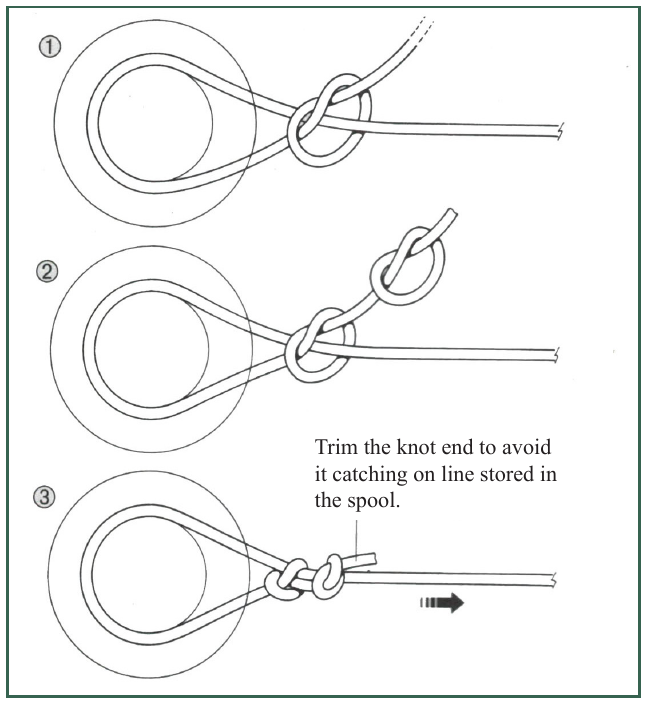
Tip: Trim the knot end closely so it doesn't catch on line stored on the spool.
Locked Half Blood Knot (Improved Clinch Knot)
This old, tried-and-tested knot is a firm favorite among anglers for attaching hooks, lures, and swivels directly to the line. It ties very successfully with fine line, though it can be a bit harder to draw up tight with heavier lines.
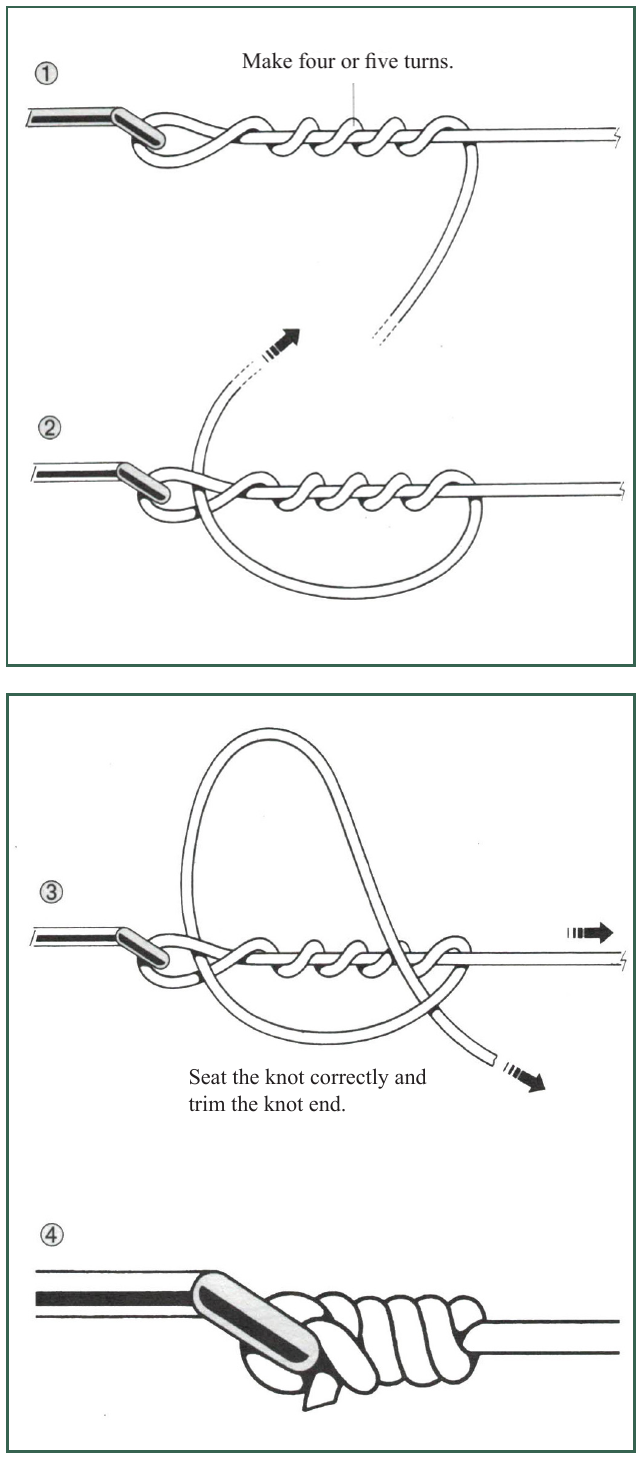
How to tie it: Make four or five turns around the standing line, then seat the knot correctly and trim the tag end.
Albright Knot
When you need to join two lines of different materials or significantly different diameters, the Albright Knot is one of the most effective options available. It's a go-to for connecting backing to leader or mono to braid.
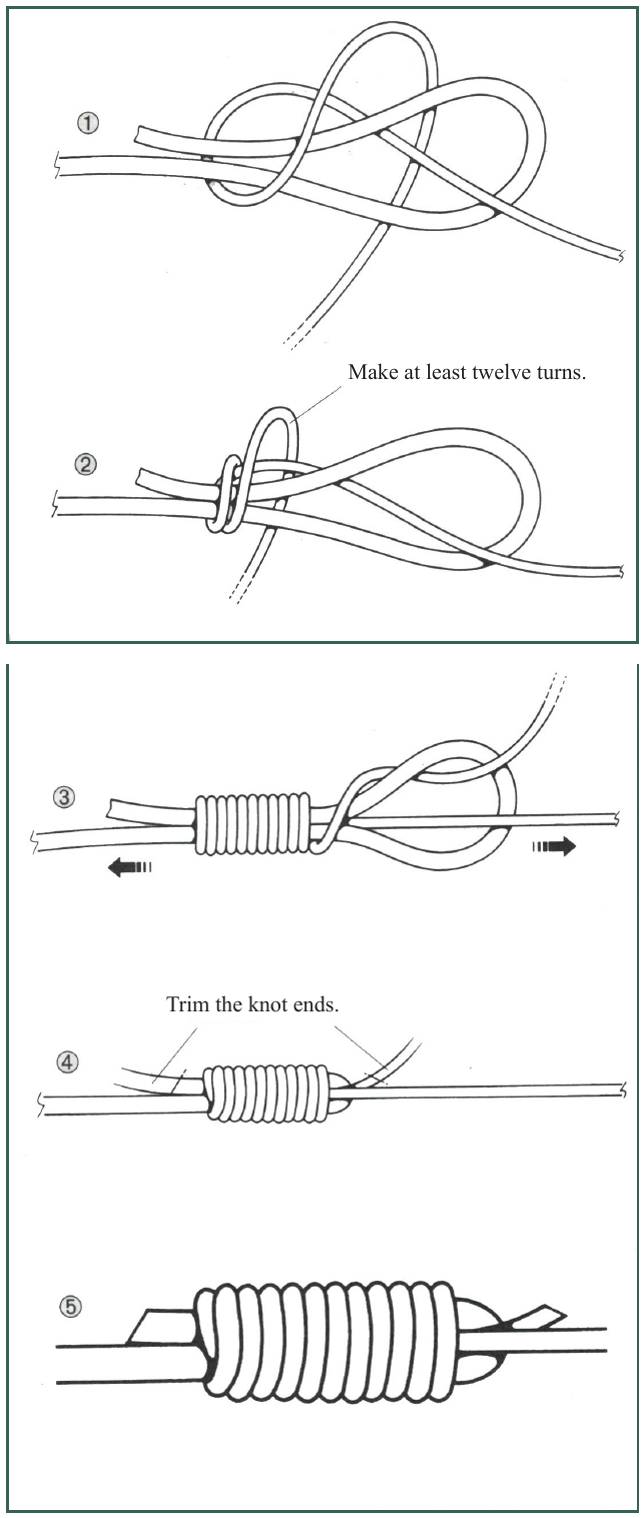
How to tie it: Wrap at least twelve turns to lock the knot in place, then trim both knot ends close.
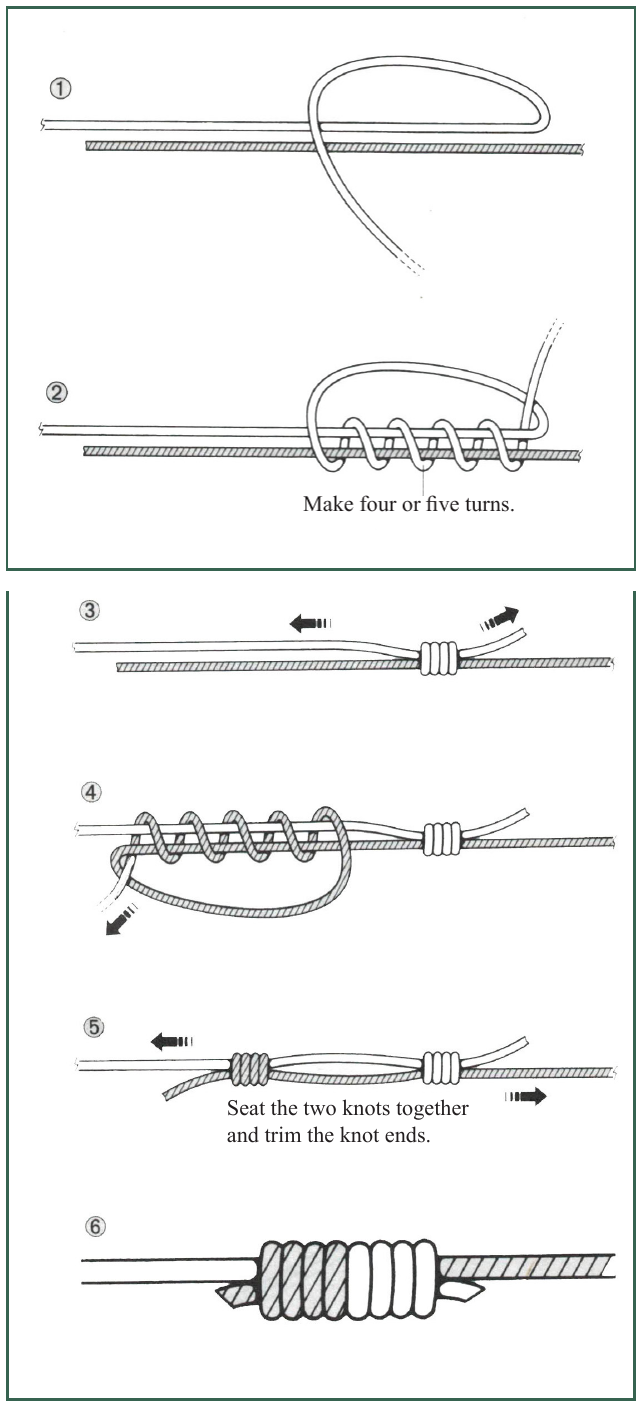
Blood Knot
One of the most widely used fishing knots in the world, the Blood Knot is a firm favorite for joining two lengths of similar-diameter line. It boasts a relatively high knot strength, making it a dependable choice for leader-to-leader connections.

How to tie it: Make four or five turns on each side, then trim the knot ends once it's seated.
Nonslip Mono Knot
This knot is ideal when you want your lure to move naturally in the water. Tying a lure on with a loop via the Nonslip Mono Knot allows for more freedom of movement and better action — whereas a tightly cinched knot can restrict how the lure swims. It performs well on both light and heavy tackle.
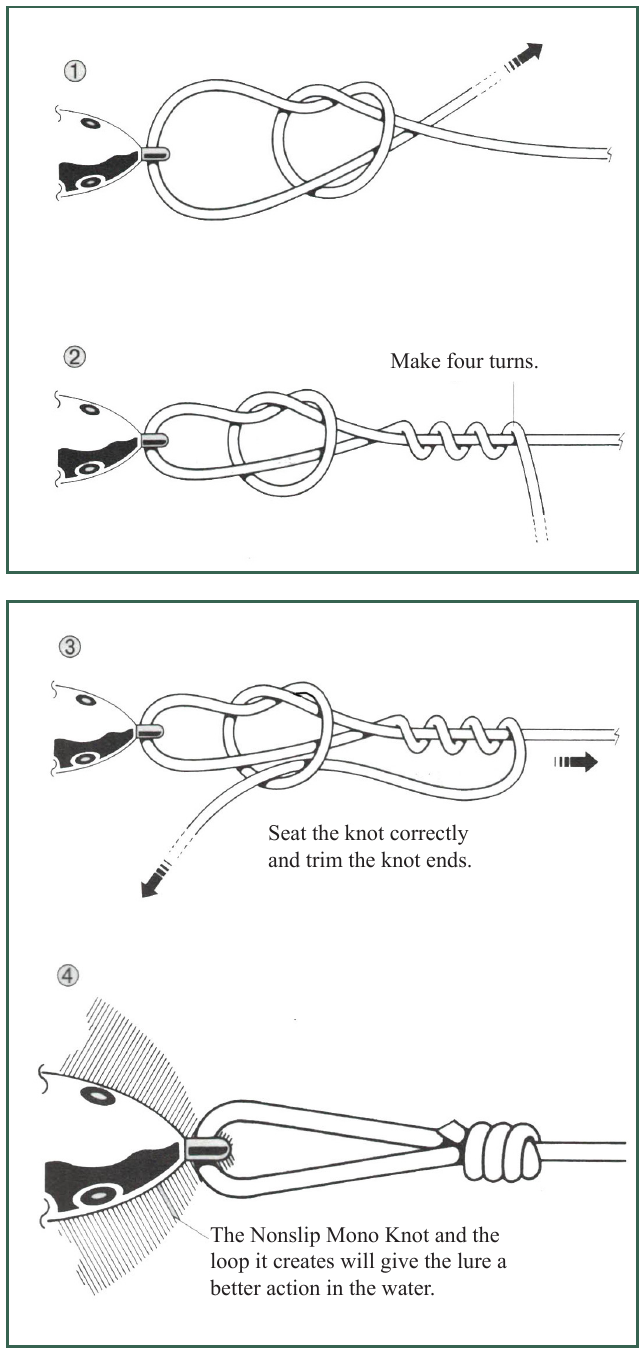
How to tie it: Make four turns, seat the knot correctly, and trim the ends. The loop this knot creates is what gives your lure that extra freedom of movement in the water.
Double Uni-Knot (Double Grinner Knot)
The Double Uni-Knot is essentially a pair of Uni-Knots (or Grinner Knots) tied back-to-back, with each knot seating tightly against the other to form an exceptionally strong connection. It's a popular choice for joining lines of similar diameter, including backing to fly line or mono to mono.
How to tie it: Make four or five turns on each side, then pull the knots together so they seat against one another, and trim the ends.
Surgeon's Knot (Water Knot)
A true all-rounder, the Surgeon's Knot is fast to tie and works with lines of equal or unequal diameters, even across different materials. It's a favorite for quickly joining leader to tippet. Keep in mind that to tie it correctly, one of the lines needs to be short enough that the end can pass all the way through the loop.
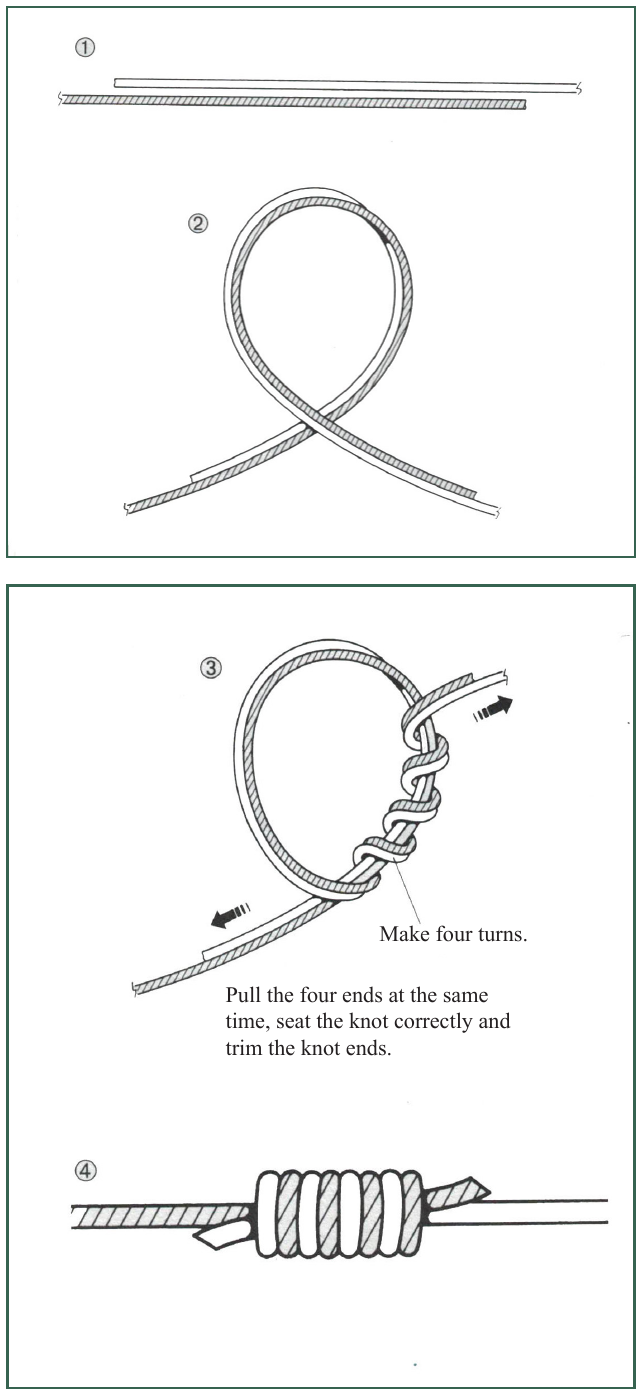
How to tie it: Make four turns through the loop, then pull all four ends at the same time so the knot seats evenly, and trim the ends.
Uni-Knot (Grinner Knot)
The Uni-Knot is an extremely reliable, versatile knot for attaching eyed hooks, swivels, and sinkers. It works well across most types and sizes of line, making it a great all-purpose knot to have memorized.
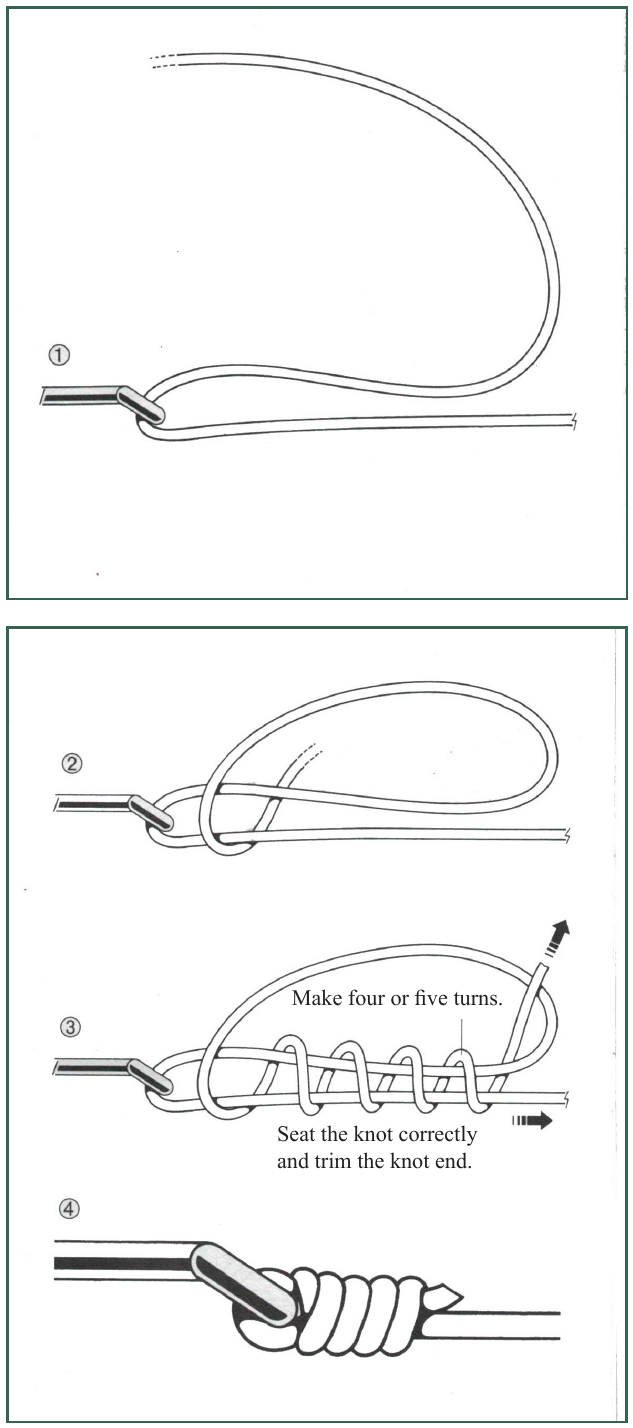
How to tie it: Make four or five turns, seat the knot correctly, and trim the tag end.
Dropper Loop (Blood Loop)
The Dropper Loop creates a loop at a right angle in the middle of your line — perfect for fly fishers attaching additional flies (called droppers) or for rigging extra weights and hooks to build a paternoster rig for boat and beach fishing.
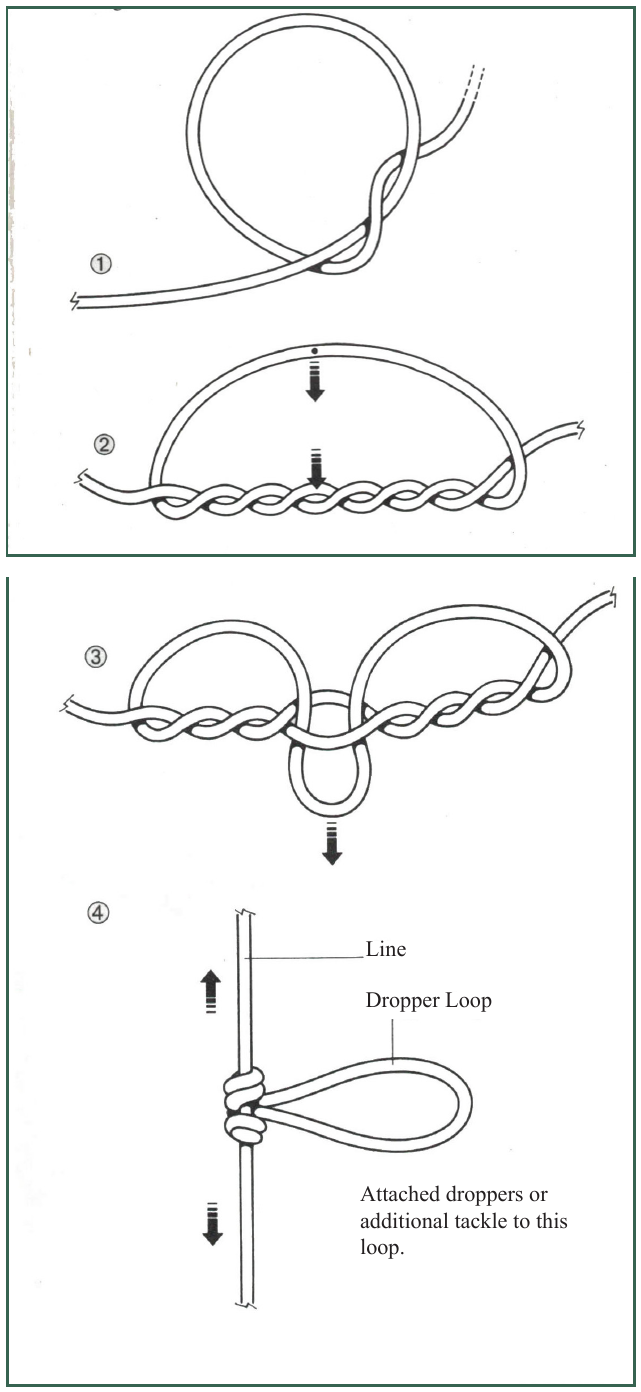
How to tie it: Work the loop down through the turns until it forms a clean loop perpendicular to the main line. Attach your dropper fly, hook, or weight directly to that loop.
Putting It All Together
You don't need to master every knot in this guide right away. Start with the basics — the Arbor Knot for spooling up, the Uni-Knot or Locked Half Blood Knot for tying on hooks and lures, and the Blood Knot or Surgeon's Knot for joining lines. From there, add the Albright Knot, Double Uni-Knot, and Dropper Loop to your repertoire as your fishing situations call for them.
The key to confidence on the water is practice on dry land. Spend some time at home tying each of these knots until they become second nature, and you'll be ready for whatever the Pacific Northwest's rivers, lakes, and saltwater have to throw at you.
Tight lines!