Fishing Knots
A fish doesn't care how good your rod is or how expensive your lure was — if your knot fails, you lose the fish. Knowing how to tie a solid, reliable knot is one of the most important skills you'll ever learn as an angler. The great news: you only need to master a handful to handle almost any situation on the water.
In this lesson you'll learn what the parts of a knot are called, five essential knots every PNW angler should know, and when to use each one.
Washington's rivers — the Skykomish, Snoqualmie, Hoh — see heavy salmon and steelhead runs. A poorly tied knot won't survive the first head-shake of a 15-pound coho. The knots you learn here are trusted by anglers chasing everything from trout to halibut.
Before You Start Tying
A few things to keep in mind no matter which knot you're tying:
- Inspect your line first. Look for nicks or fraying before tying — a compromised line will break at the knot.
- Wet the knot before cinching. Moisten it with saliva or water. Dry line creates friction and heat when pulled tight, which weakens it.
- Draw it tight slowly and evenly. Yanking fast is the most common cause of a weak knot — pull steadily until you feel it seat.
- Trim the tag end close. After tightening, snip the leftover end short so it doesn't catch on guides or weeds.
- Practice at home first. Use a heavier rope or cord before trying with thin fishing line. You'll build muscle memory much faster on dry land.
Knot Vocabulary
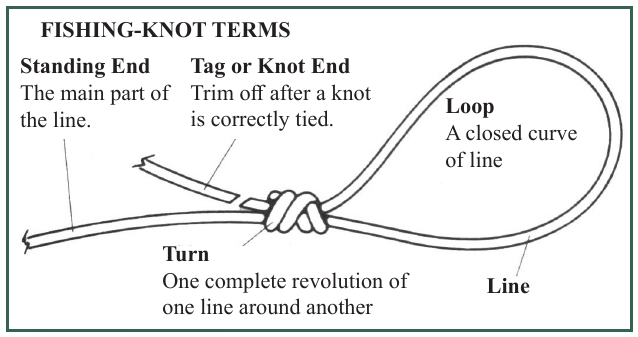
Knot instructions use specific terms. Learn these four and you'll be able to follow any knot guide:
| Term | What It Means |
|---|---|
| Standing End | The main, longer part of the line — the part that runs to your reel or lure. |
| Tag End | The short working end you tie with and trim off once the knot is seated. |
| Turn | One complete wrap of line around something — another line, a hook eye, or itself. |
| Loop | A closed curve of line — when the tag end crosses back over the standing end to form an oval. |
When a guide says "make 5 turns," wrap the tag end around the standing line 5 times. Count out loud as you wrap — it's easy to lose track.
The Five Knots You Need
You don't need to learn every knot in the book. These five cover almost every situation you'll face fishing the Pacific Northwest — from spooling a reel to landing a salmon.
1. Arbor Knot Easy Attaching line to a reel spool
The Arbor Knot is the very first connection you make when setting up a rod — it attaches your fishing line to the spool of your reel before you wind it on. Without this knot, the line would just slip freely around the spool and never wind up properly.
- Pass your line around the reel spool (the "arbor").
- Tie a simple overhand knot around the standing line with the tag end.
- Tie a second overhand knot in the tag end itself, about 1 inch from the first — this acts as a stopper knot.
- Wet the knot, pull the standing line to slide the first knot snug against the spool, then trim the tag end close.
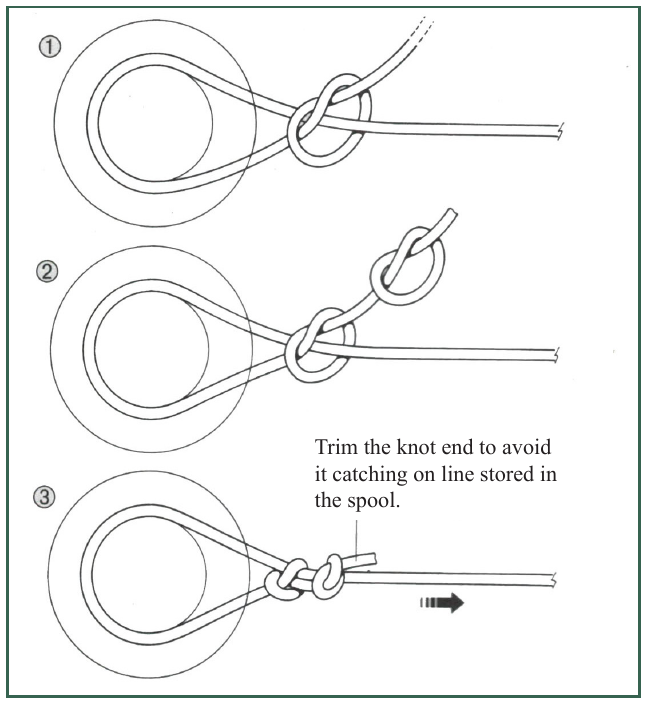
Trim the tag end very short after tightening — a long tag end will catch on line winding over it and create bumps on your spool.
2. Improved Clinch Knot Easy Tying on a hook, lure, or swivel
Also called the Locked Half Blood Knot, this is the single most-used knot in fishing. It's reliable, quick to tie, and works well with monofilament and fluorocarbon lines. If you only learn one knot, make it this one — you'll use it to attach hooks, lures, and swivels for the rest of your fishing life.
- Pass 6 inches of line through the eye of the hook or lure.
- Wrap the tag end around the standing line 5 times, going away from the hook.
- Pass the tag end back through the small loop that formed right at the hook eye.
- Pass the tag end back through the large loop you just created.
- Wet the knot, pull both ends to cinch it tight against the hook eye, then trim.
This knot can slip on braided line. If you're fishing braid, use the Uni-Knot below instead.
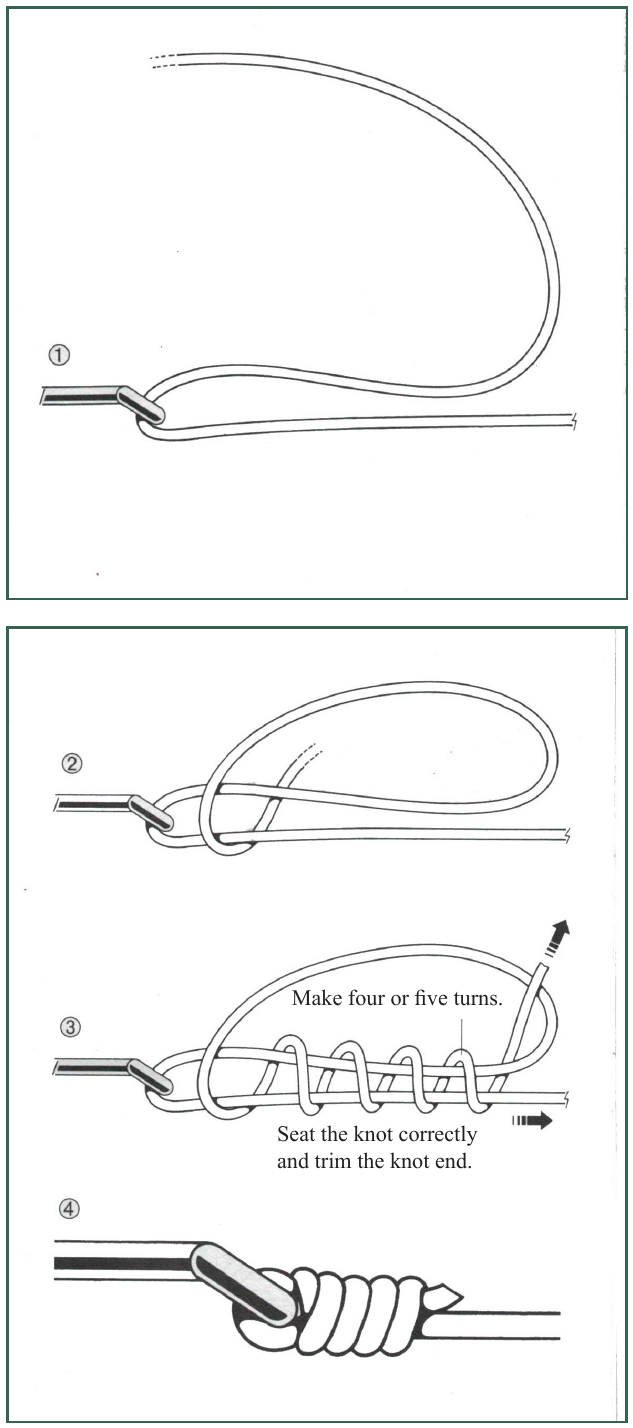
3. Uni-Knot Easy–Medium Hooks & swivels on any line type
The Uni-Knot is one of the most versatile knots in fishing — it works reliably on mono, fluorocarbon, and braided line, and holds up well on heavier lines where the Improved Clinch can struggle. Many experienced anglers use only the Uni-Knot for all their terminal connections.
- Pass 8 inches of line through the hook eye and double it back alongside the standing line, forming a loop.
- Wrap the tag end around both the standing line and the loop 5 times, going toward the hook.
- Pull the tag end to close the coils, but keep the knot loose enough to slide.
- Wet the knot, then pull the standing line to slide the knot down to the hook eye.
- Pull firm to seat it, then trim the tag end.
4. Surgeon's Knot Medium Joining two lines together
At some point you'll need to join two pieces of line — connecting a leader to your main line, or adding a length of fluorocarbon near your hook. The Surgeon's Knot is the fastest and most beginner-friendly option for this job. It works with lines of similar or different diameters and even across different materials (mono to fluorocarbon).
- Lay the two lines alongside each other, overlapping by 6–8 inches.
- Form a loop with both lines together.
- Pass both tag ends through the loop 4 times.
- Wet the knot thoroughly, then pull all four ends at the same time so it seats evenly.
- Trim both tag ends close.
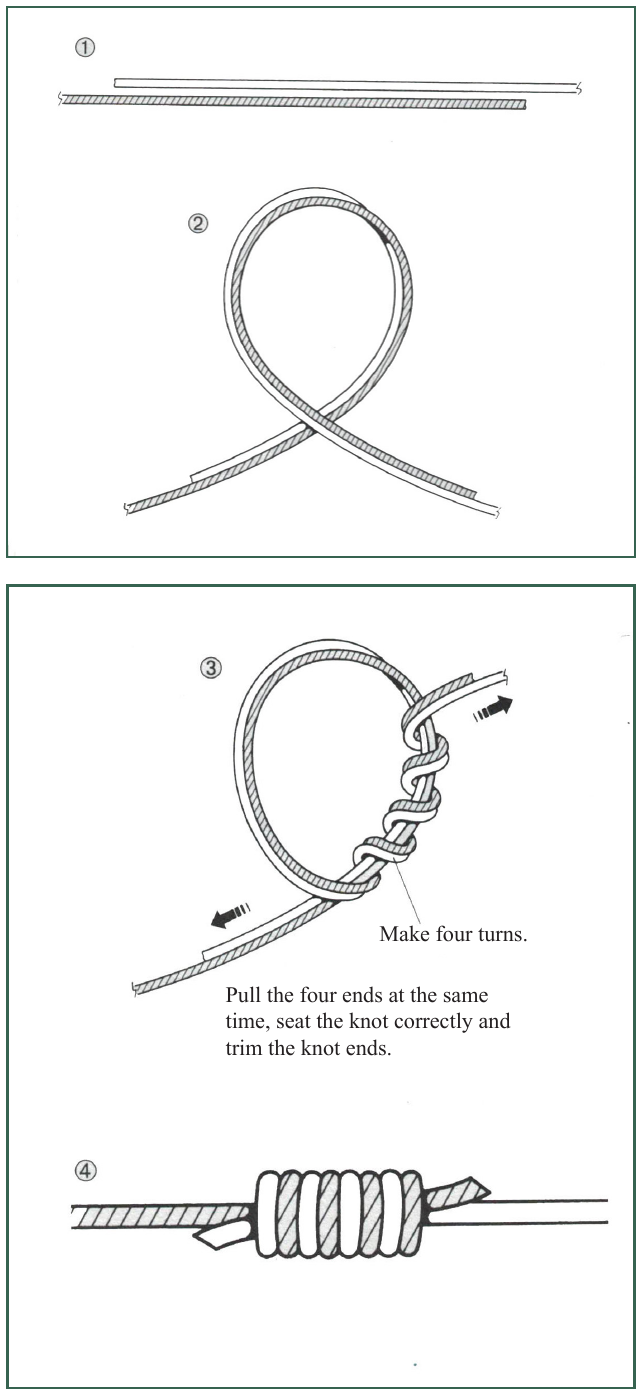
Pull all four ends at once. If you pull one side first, the knot seats unevenly and loses strength.
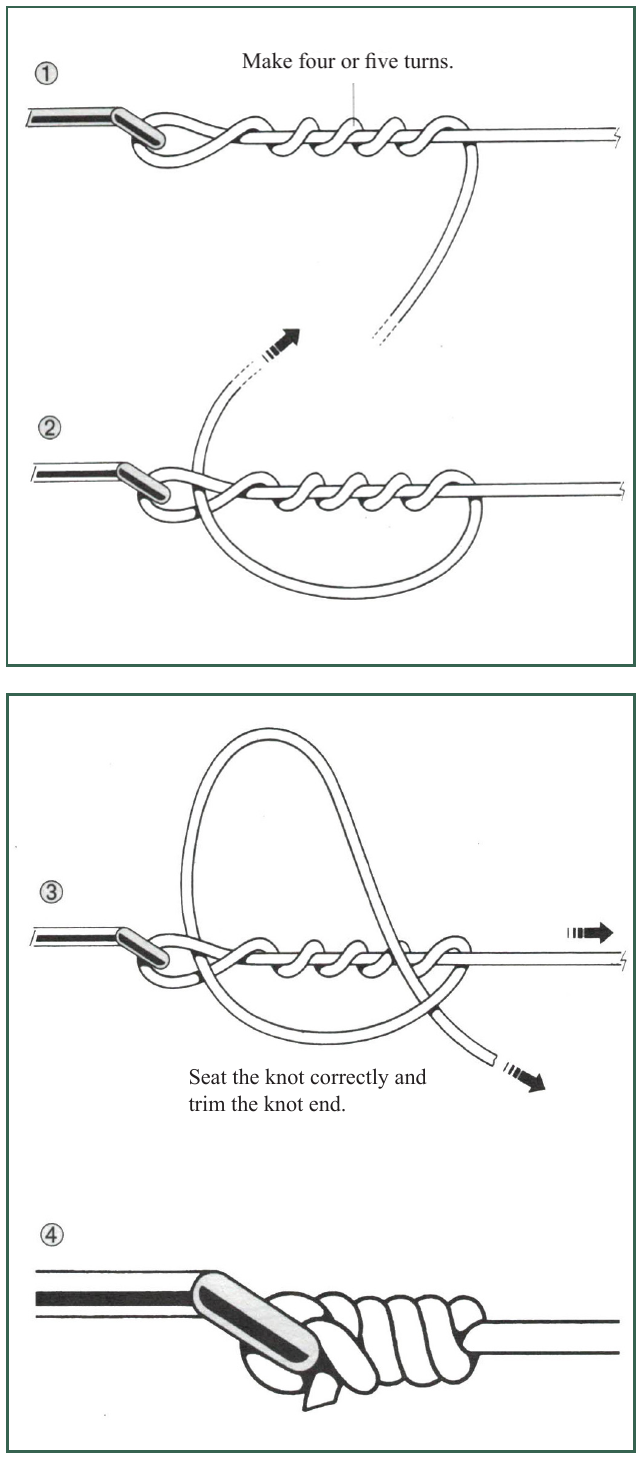
5. Nonslip Mono Knot Medium Lures — for maximum action
When you cinch the Improved Clinch directly against a lure's eye, it restricts how the lure moves in the water. The Nonslip Mono Knot creates a small fixed loop instead, giving the lure freedom to swing, dart, and wiggle more naturally. For spinners, spoons, and swim baits, this extra action can make a real difference.
- Tie a loose overhand knot in the standing line about 6 inches from the end — don't tighten it.
- Pass the tag end through the lure's eye, then back through the overhand knot loop.
- Wrap the tag end around the standing line 4 times.
- Pass the tag end back through the overhand knot loop again (same direction you came from).
- Wet the knot, pull both the standing line and tag end to seat it, then trim. The small loop between the overhand knot and the lure eye should remain open.
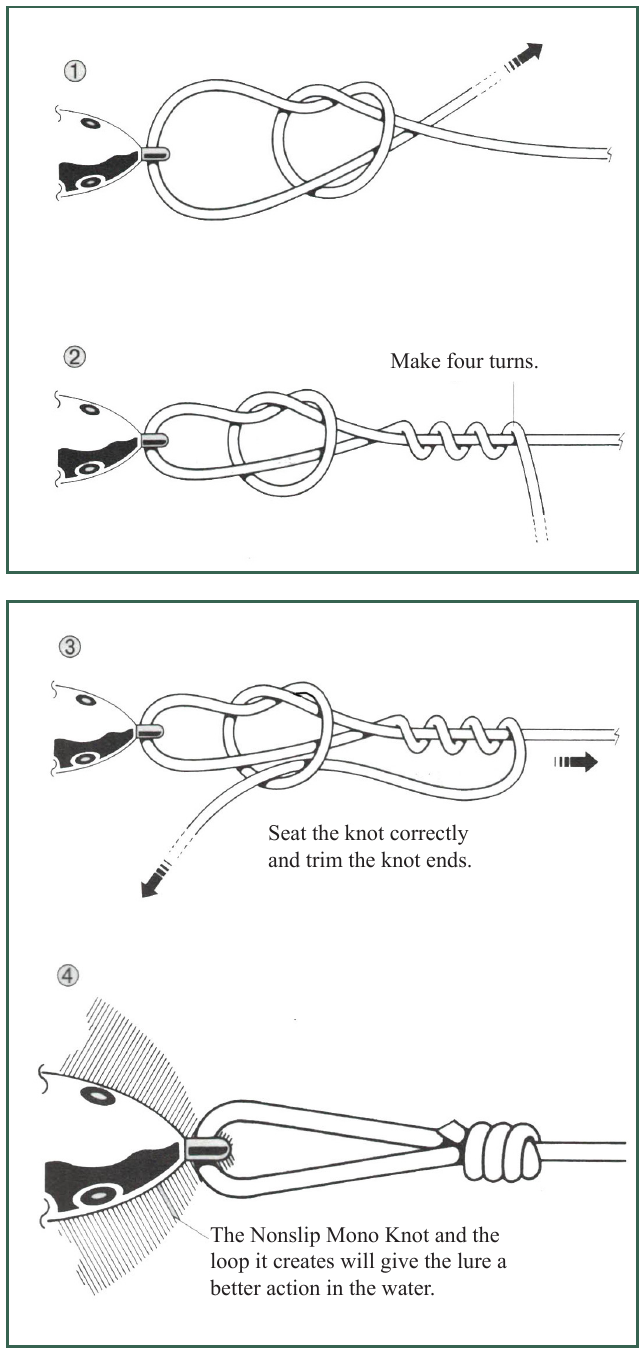
Don't tighten away the loop. That small loop between the knot and the lure eye is the whole point — it's what lets your lure swim freely.
Which Knot for Which Situation?
Here's a quick decision guide so you always know which knot to reach for:
- Spooling a new reel? → Arbor Knot
- Tying on a hook with mono or fluorocarbon? → Improved Clinch Knot
- Tying on a hook with braided line? → Uni-Knot
- Tying on a lure you want to swim freely? → Nonslip Mono Knot
- Joining your main line to a leader? → Surgeon's Knot
A common shore fishing setup in Puget Sound: 10 lb mono main line → Surgeon's Knot to join → 18 inches of 8 lb fluorocarbon leader → Improved Clinch or Nonslip Mono to hook or lure. Three knots, one proven rig.
The full knots guide also covers the Blood Knot, Albright Knot, Double Uni-Knot, and Dropper Loop — great to learn as you advance. Read the complete guide →